Write an email
To write a new email, click Compose in the top left corner of the screen.
Choose recipients
One recipient
Enter the recipient's address in the To field or select the contact from the address book. As soon as you start typing the first letters of a name, surname, or email address, you will see a list of matching contacts.
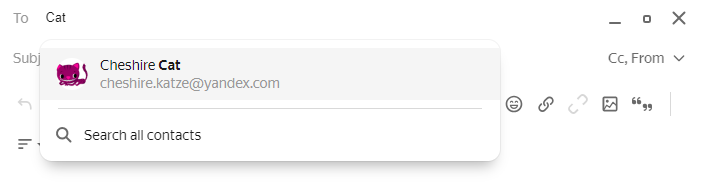
To search names or surnames, you can use Cyrillic instead of Latin characters and vice versa.For example, to search for Bill the Lizard, you can start typing the name with either the Latin B or the Cyrillic Б. Recipients you have recently messaged are listed first.
Multiple recipients
You can send your message to several recipients at once. To do this, enter several addresses, each separated by a comma and a space, in the To field. For example, cheshire.katze@yandex.com, just.mad.hatter@yandex.com, just.white.rabbit@yandex.com.
Note
One message can be sent to a maximum of 50 recipients in the Mail web interface and 35 recipients in the mail program. To learn more, read Sending a large number of messages.
If you have one main recipient and several optional recipients, type the main address in the To field and then type the remaining addresses in the Cc field. To view the Cc field, click the Cс, From ˅ button in the upper-right corner.
Every recipient will be able to see all the addresses entered in the To and Cc fields. If you want to hide certain addresses, then simply move them to the Bcc field.
Alert
A recipient entered in the Bcc field may not get your email because some spam filters delete these types of emails.
To move an address from the To field to another field (for example, Cc), drag the address you need by pressing and holding the left mouse button.
Select the sender's address
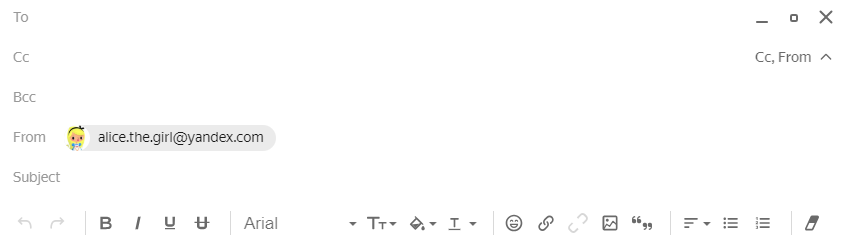
You can send messages from various email addresses: your primary Yandex email, one of your email aliases, or a mailbox hosted on another service (like Gmail or Mail.Ru).
Choose an address to send messages from
For all messages
- You can choose which address to send emails from in the Personal information section in the settings. This will be your default address for all emails. It will also be displayed in the upper-right corner on Yandex Mail pages when you click the user's name and profile picture.
For a specific message
-
You can choose the address for sending a message on the page where you compose emails. The address you select will only be used for this particular message.
- Click Cс, From in the top right corner.
- Click the name in the From field.
Format the text body
Use the formatting panel to change text to bold or italics, change the font color and size, create bulleted or numbered lists, attach an image, add a link, and so on.

If you want to remove formatting, select part of the text and click ![]() .
.
Add a file
You can attach files to a message:

Upload from a computer
- Under the email text box, click
 .
. - Select the files you want on your PC and then click Open.
Alert
If you can't attach multiple files at the same time, refresh the page by pressing Ctrl + F5 and try to attach the attachment again. To learn more, see I can't attach a file.
If you attached a file by mistake, click ![]() in the upper-right corner of its thumbnail.
in the upper-right corner of its thumbnail.
Many mail services don't accept attachments larger than 10 MB. If you are not sure that your attachment can be sent as is, send it in parts (in several messages) or attach the files to your message via Yandex Disk.
If the attachments are larger than 25 MB, the files are automatically uploaded to your Yandex Disk in the Email attachments folder. To learn more, see Help for Yandex Disk.
The maximum attachment size is 1 GB. You can add larger files to messages only if you have a Yandex 360 plan.
Add from Yandex Disk
- Under the email text box, click
 .
. - Select a file or folder and then click Attach.
The recipient will receive a message with links to download the attachments. The download links to the attachments are available only to users who participate in the correspondence.
Note
The maximum size of a file added from Yandex Disk is 10 GB. The number of such attachments is unlimited.
If you can't attach a file from Yandex Disk, it may be because you ran out of space there. To learn more, go to Help for Yandex Disk.
Add from mail attachments
You can attach a file from a list of all the files you ever sent or received.
- Under the email text box, click
 .
. - Select the folder that contains the email with the desired attachment. Folder names are displayed in English.
- Select the file and click Attach.
Attach a picture
There are several ways to insert an image into the email body (instead of adding it as an attachment):
Using the clipboard
-
1. Copy the image to the clipboard. For example, if you want to send an image from another site, right-click it and select Copy image.
2. Open the compose an email page, right-click the place on this page where you want to insert the image, and click Paste.
Dragging and dropping from a computer
-
Drag and drop the image on the compose an email page.
Note
If you drag and drop an image to the text box, the image will be inserted into the message body. If you drag and drop an image below the text box, it will be attached to the email.
Using the formatting toolbar
-
1. In the formatting toolbar above the text input field, click
 → From computer.
2. Choose an image and click Open.
3. If necessary, change the size of the image. To do this, select it and pull one of its corners.
Add a label
If you want to mark an email as important or label it in some other way, click  → Add labels → Flagged (or another label) under the email text box.
In the list of sent messages, the email will be highlighted in red (if you marked it important) or have a label (if you added one). The email recipient won't see your labels.
Choose a signature
If you have several signatures, you can choose a specific one when composing a message, or set up signature auto-selection.
- Move the cursor to the current signature.
- Click
 that appears in the upper right corner of the signature block.
 - Choose a signature.
By address
- To use a signature when sending messages from a specific mailbox alias, select the Link to address option in the Your signatures section on the Personal information page and choose the email address.
By message language
-
Yandex Mail can change your signature depending on your message's language (for example, you'd have a signature in Turkish if you were writing an email in that language). To use this signature in replies to messages in another language, assign it to that language in Your signatures:
1. Move your cursor over the upper right corner of your signature.
2. Click the icon that appears.
3. Select the language needed from the list.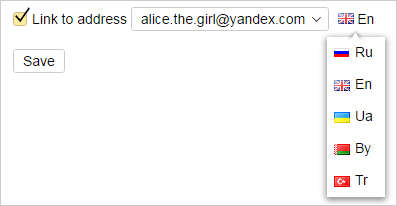 .
.4. Click Save.
Take a break
When you write a message, all changes you make are automatically saved as a draft every 10 seconds. You can take a break at any time and return to the message later. To collapse the edit window, click ![]() in its top right corner. To expand it again, click the email tab in the lower right corner of Yandex Mail.
in its top right corner. To expand it again, click the email tab in the lower right corner of Yandex Mail.
Create a message template
If you frequently send similar or identical messages (e.g., invitations or CVs), you can save them as templates. Unlike drafts, templates will not disappear once your message is sent. All templates are reusable, so you can easily compose template-based emails to your partners, colleagues, or friends.
To create a template:
- Write an email and enter a subject. Add an attachment, if necessary.
- When you're done, click
 → Save as template:
All templates you create are saved in a special folder Drafts → Templates. They contain only the subject, attachments, and message body text (no recipients).
Send your message
Before sending the message, you can set up additional options: notifications or delayed delivery.
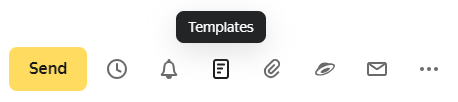
When your message is ready, click Send.
You can cancel sending within the next few seconds if the corresponding option is enabled.
Notifications
If you want to receive a delivery report, click ![]() → Notify me when messages are delivered (under the email text box).
→ Notify me when messages are delivered (under the email text box).
Once the message is successfully delivered, a report will be sent to your mailbox.
Alert
The report means the message was delivered, not that it was read.
If you send an important letter that requires a response, you can set a reminder if a response isn't received in a certain certain period of time.
To do this, before sending your message:
- Click
 → Remind me if no reply is received by (under the email text box).
 - Set a date that you can wait until to receive a response.
If the recipient doesn't respond within the period you specified, you will receive a reminder to send the message again.
To view emails waiting for the response, click  under the list of folders.. If you don't want to wait for a response anymore, open the email and click Don't wait.
Delayed delivery
If you want your message to be sent on a certain date and time:
- Click the
 button under the text input field.
 - Specify when to send the message: select one of the options or set the date and time manually.
Note
You can postpone sending your email for up to one year from the current date.
Cancel sending email
If you sent an email by mistake, you can cancel sending it within a few seconds of sending. To enable the option:
- In the top right corner, click
 → All settings.
 - Select Interface.
- Go to Editing and sending messages → Cancel sending email and specify the interval of 5, 10, 20, or 30 seconds.
To disable the option, select Disable.