3.3.4. Obstacles and road signs
To map movement prohibitions and restrictions in various road directions at intersections, movement prohibitions and restrictions along road sections separated from the road network by obstacles (checkpoints, barriers, gates, road signs, concrete blocks, and so on), and to prevent plotting routes through restricted areas, we use special objects called Road signs
(or Maneuvers
).
Alert
Currently, the maneuvers that apply exclusively to trucks are created and edited only by employees.
3.3.4.1. Road signs
There are three types of Road signs
in Yandex Map Editor:
3.3.4.1.1. Restricted maneuver
Used to display:
-
Zone of restricting signs and markings, like
Right turn is prohibited
,Left turn is prohibited
, and so on. -
Vehicle entrances or exits that are not used at the present time or are permanently blocked (permanently closed gates, concrete blocks, and so on).
-
Entrances and exits to a territory intended for the use of its residents, provided there's also a dedicated guest entrance or exit.
-
Restricted passage with exceptions for certain vehicles (for example, passage is prohibited by road marking or signs, but there are special documents allowing some vehicles to pass).
-
Zone of the
No entry
road sign (place theRestricted maneuver
road sign directly at the road intersection after which the sign is actually located). -
Restrictions on a maneuver for a specific type of transport (such as a restriction on left turns for bicycles on multi-lane roads).
-
Restrictions or obstacles for the passage of pedestrians or cyclists, entry of taxis into a certain area when there's an alternative entrance and exit, entrance and exit from a territory (for example, when there's a checkpoint that only vehicles can use to access the territory, while pedestrians need to use a separate entrance).
-
Technical restrictions where dual-lane roads merge into single-lane roads (when U-turns are prohibited by traffic regulations):
-
Technical restrictions on longer intersections, when there's a shorter way via an exit or main road (if at least one of the road sections is unpaved, don't add the technical restriction). For example:
Roundabouts and U-turns are marked as maneuvers if they are restricted by signs or markings. For example:
-
Technical restrictions on short intersections not allowed by traffic regulations (if at least one of the road sections is unpaved, don't add the technical restriction).

-
U-turn restrictions at an intersection (only applied by employees in rare cases where the route is plotted with two U-turns in a row at an intersection of two-lane roads):
3.3.4.1.2. Legal U-turn
Legal U-turns are set:
- On one-lane roads of class 1–7 at locations where the solid lane breaks.
- On one-lane roads of class 1–7 at their intersections with class 1–9 roads (except for situations where there's a sign or marking restricting U-turns).
- On class 1-9 roads if public transport makes a u-turn at that location (in this case, the value of the
Available for
field is set only toPublic transport
).
3.3.4.1.3. Restricted entry
Used to display:
-
— Gates (including those on paid parking lots and at the entrance to the public area of an airport).
-
— Security checkpoints (restricting entry to transports, pedestrians, or both).
-
— Entrances to areas via the only available road blocked with a
No entry
sign while being open to locals and staff working for organizations located beyond the sign. In this case, the restriction is set at the nearest intersection before the sign. -
— Entrances to a road that ends up being isolated due to lane marking before the entrance, although entry to this road is actually permitted. In this case, the restriction is set at the nearest intersection before the entrance.
-
— Situations when access to a public road (applies to class 6-7 roads that have no
Residential area
attribute because of other signs) is restricted with aNo traffic
or aNo motor transport
sign in one lane, but the other lane is open. In this case, the restriction is set at the nearest intersection before the sign.
Entry restrictions are not set for the following items:
-
Barriers at railroad crossings (see 3.8.6. Railway crossings);
-
Barriers at toll booths on toll roads, including ferry and ice crossings, as well as barriers at traffic police posts.
-
Toll boom gates on public roads.
-
Boom gates located on road sections only accessible by public transport (or only accessible by public transport as well as pedestrians and cyclists)
-
Never-closing gates and barriers
-
Checkpoints at national borders.
-
No entry
signs with a label that the sign doesn't apply to residents or employees in the restricted area or other related exceptions, andNo traffic
signs at the entry to class 8 roads. -
Boom gates at the exits from a fully restricted area.
3.3.4.2. Drawing rules
3.3.4.2.1
The road sign should include the minimum number of lanes that unambiguously define the restriction or prohibition.
When creating a prohibited or restrictive maneuver on an intersection that includes a road with two lanes, select the point that's considered an entrance to the intersection for the given direction:
|
Correct |
Incorrect |
|
|
|
3.3.4.2.2
When displaying obstacles for passage/access on the map (checkpoints, boom gates, barriers, and so on), split the sections of the road network at the location of maneuvers of the Restricted entry
type. Don't use already existing intersections to create maneuvers of this type.
|
Correct |
Incorrect |
|
|
|
3.3.4.2.3
If there are obstacles on the road (checkpoints, boom gates, concrete blocks, road signs) this doesn't mean that some types of vehicles should be disabled on road sections. If it's technically possible to travel within the borders of the restricted area, there are no additional restrictions by vehicle type posted on road signs, and an "Entrance by permit" sign was already placed at the entrance or exit, then you shouldn't disable the vehicle accessibility attribute.
An exception is made in cases where the entry of taxis into the area is restricted by administration (without the installation of a no-entry sign). In such cases, disable taxi accessibility from road network sections on all entrances to the territory and on all road sections located within it.
3.3.4.2.4
If the only or all entrances/exits to the territory (enterprise, residential complex, cottage settlement, and so on) are restricted by obstacles, then maneuvers of the Restricted entry
type are set at the only or at all entrances/exits to the territory. In this case, don't set maneuvers that restrict exit from the territory.
If not all entrances/exits to the territory are restricted by barriers, then set the Restricted entry
maneuvers at the locations of the barriers in both directions. Only consider class 1-8 roads when determining whether an area is restricted for motor vehicles.
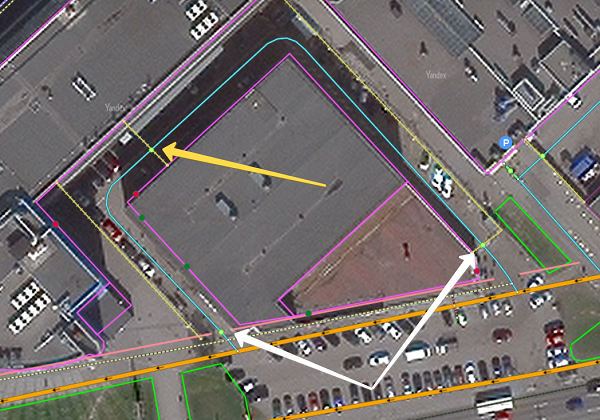
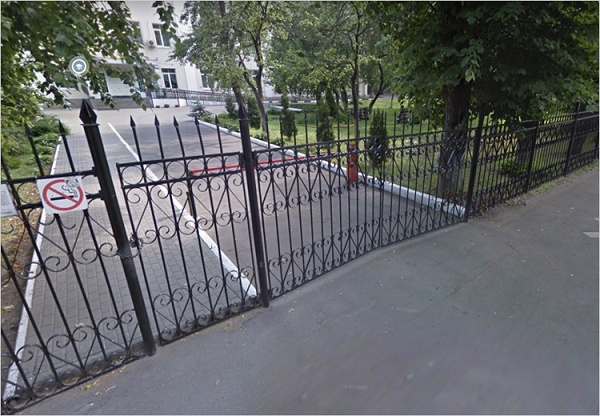
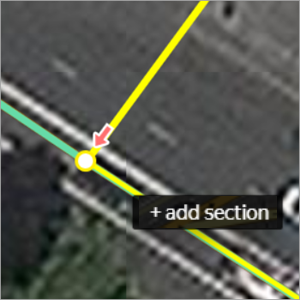
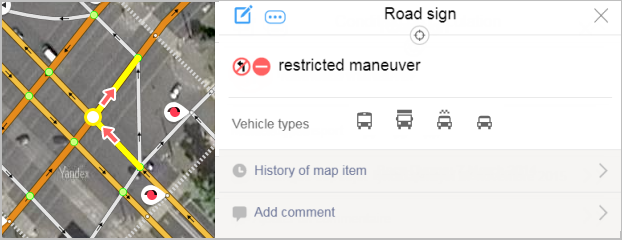
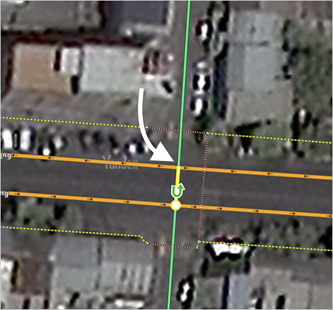
For example, in the picture below, there's a garage cooperative with an entrance on one side restricted by a boom gate (white arrow) and open on the other side (yellow arrow). Set two opposing Restricted entries
at the location of the boom gate.
3.3.4.2.5
If there are several entrances/exits to a restricted area, one of which is intended for guests and the others are for service, then set Restricted entry
at all entrances/exits to the area, and for service entrances/exits, add two opposing Restricted maneuvers
at the same intersection.
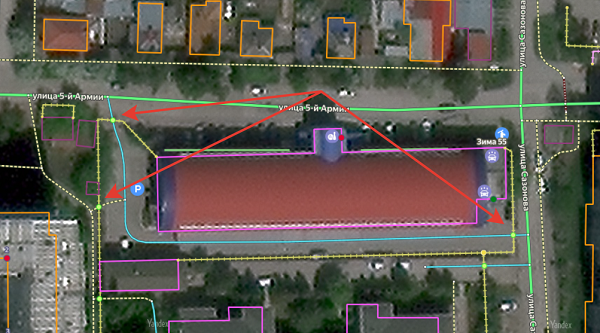
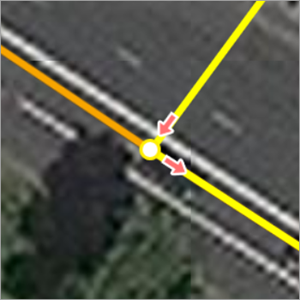
For example, the blue arrow marks the guest entrance on the picture, the red arrow marks the service entrance, and the green arrow marks the location of the restricted maneuver sign (the same point where entry restrictions apply):
Service entrances/exits include residential entrances/exits (which can only be accessed with a key, pass, and so on), entrances for special services (including mail delivery services, delivery of goods to commercial organizations), and entrances intended for use in emergency or non-standard situations.
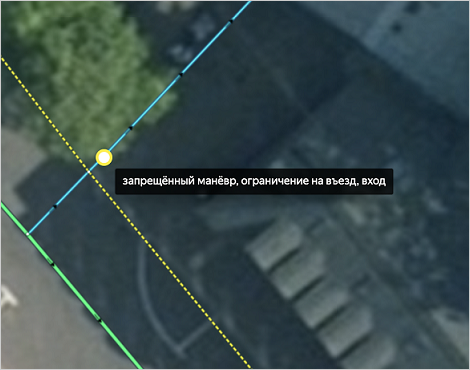
Residential one-way entrances are not considered to be isolated from the road network:
3.3.4.2.6
Set the obstacles for passage/access located within a restricted area with two opposing Restricted entries
.
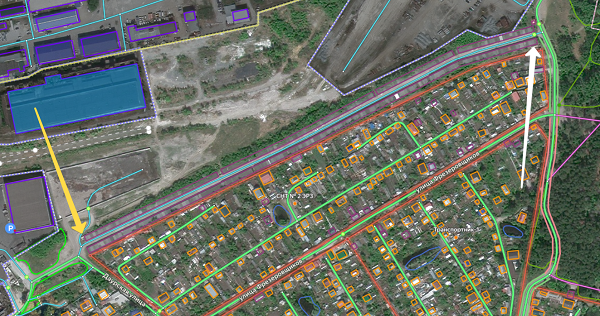
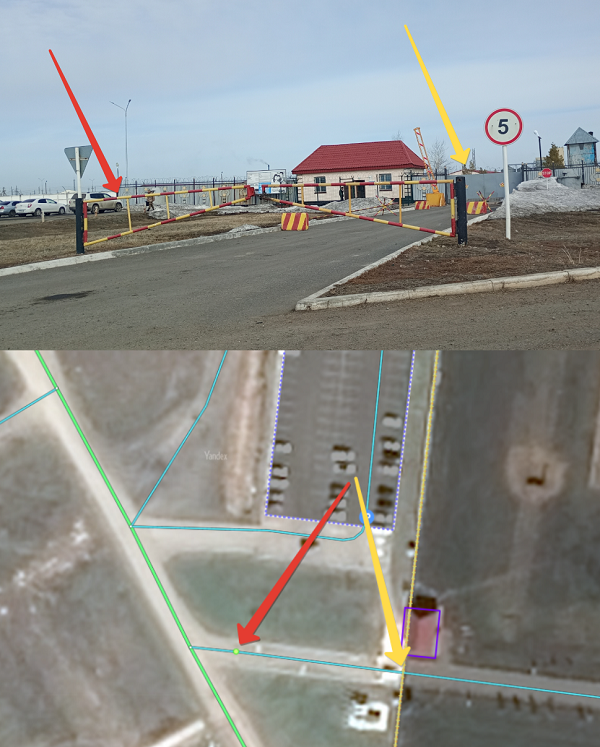
For example, in the picture below, the white arrows mark the boom gates that restrict entry to the area, and the yellow arrow marks the boom gate located inside this restricted area. Set one Restricted entry
at locations marked by the white arrows and set two opposing Restricted entries
at the location marked by the yellow arrow.
3.3.4.2.7
Maneuvers of the Restricted entry
type should be coordinated among all entries to or exits from the restricted area. When creating and editing a new maneuver, check how other maneuvers are set in the area, create any missing maneuvers, delete any unnecessary ones, and verify vehicle accessibility in the maneuvers.
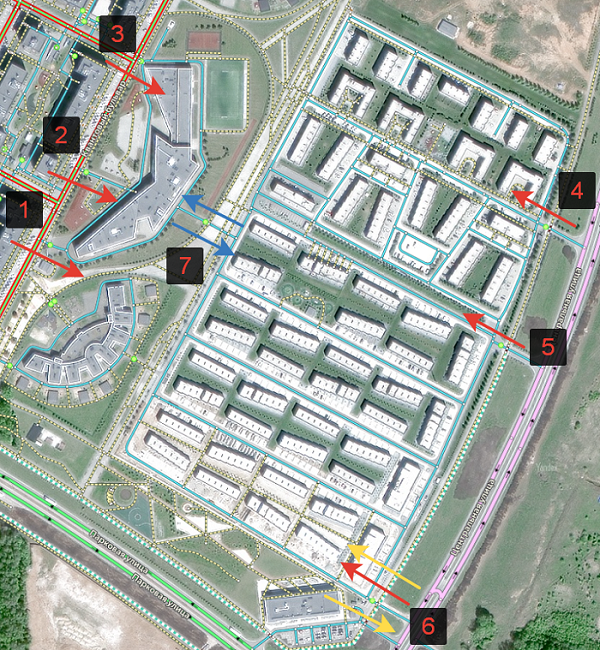
The diagram below shows correct and complete vehicle maneuver placement for a residential complex and lyceum. The lyceum territory is accessed through entrances 1, 2, and 3. The residential complex territory is accessed through entrances 4, 5, and 6, where entrance 6 serves only complex residents, making it a service entrance. Gates at point 7 separate the residential complex and lyceum while allowing passage between the territories. Place maneuvers for these territories as follows: create Restricted entry
maneuvers at entrances 1, 2, 3, 4, 5, and 6, directing restrictions toward territory entry (red arrows). Since point 6 is a service entrance, add two opposing Restricted maneuver
maneuvers alongside the Restricted entry
maneuver (yellow arrows). All entrances to the shared lyceum and residential complex territory are restricted, and gates exist within this restricted area (between lyceum and residential complex at point 7). Add two opposing Restricted entry
maneuvers at the gate location (blue arrows).
3.3.4.2.8
If boom or other gates (or a boom gate + a gate) located close to each other function as a composite checkpoint, mark them with a single Restricted entry
sign:
Place the maneuver at the first obstacle encountered when entering the territory:
3.3.4.2.9
If an obstacle that effectively blocks passage is placed on the road (for example, if an intra-block driveway is blocked by a concrete barrier), set two Restricted maneuvers
(they prohibit passage through the obstacle in both directions) at the location of this barrier.

When the road network is drawn this way, it does noes not split at the location of the barrier, though no routes can be plotted that intersect with the barrier.
If a road section can't be accessed by car due to obstacles installed on both sides of the road (for example, concrete blocks at the beginning and end of the section), then set the class of this section to 10 (Pedestrian and bike paths), and don't create Restricted maneuvers
.
3.3.4.2.10
Use the "Residential area" attribute to represent the No traffic
and No motor transport
signs (see 3.3.2.15. Residential area).
3.3.4.2.11
If the only road leading inside an area is closed off with a No entry
sign and access is only permitted for emergency vehicles, the road should be marked as accessible only to pedestrians and bicycles, and its class should be downgraded to Pedestrian and bike paths
(class 10).
3.3.4.2.12
As pedestrian routing ignores the direction attribute on road network sections, you may set the restricted entry traffic condition for pedestrians moving against the flow on the road in the case when the entry to the area is restricted by a gate or a boom gate.

3.3.4.2.13
If there are road markings and signs that permit a maneuver that was previously prohibited (for example, if the solid line or traffic directions have been erased), you should reflect the actual state of the roadway in that location.
3.3.4.3. Rules for adding and attributing
You can only set a road sign after you have finished mapping the road sections that they apply to.
Each intersection should only display the road signs that are applicable.
Road signs
items include the following components:
-
The Intersection or crossing where the road sign is in effect.
-
The type of road sign:
Restricted maneuver
,Legal U-turn
, orRestricted entry
. -
The section or sections of road where the road sign is in effect.
The
Legal U-turn
sign applies to one section of the road, whileRestricted entry
andRestricted maneuver
signs apply to two or more sections of the road (before and after the intersection where the road sign takes effect).
There are multiple ways to add a road sign:
-
You can use the Create → Road infrastructure command, select the appropriate road sign in the panel that opens, and then select the intersection that it relates to on the map.
-
You can select the appropriate intersection on the map and then connect it to a new road sign.
Further actions are performed the same way.
-
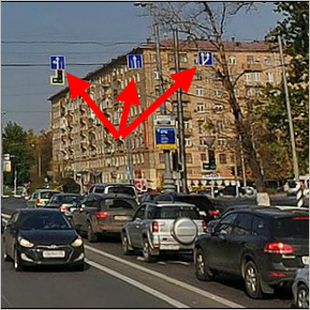
Determine where the appropriate intersection is (for example, by finding a road sign).
If there is no appropriate intersection, create one.
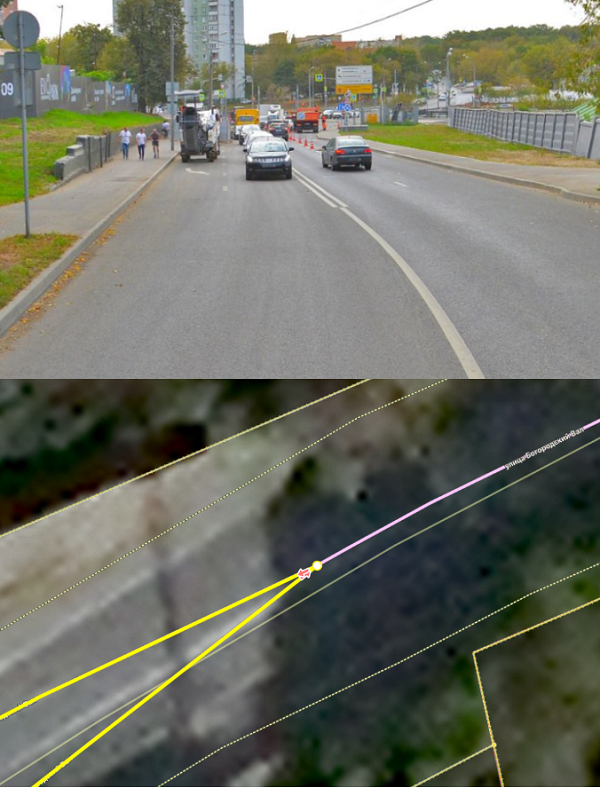
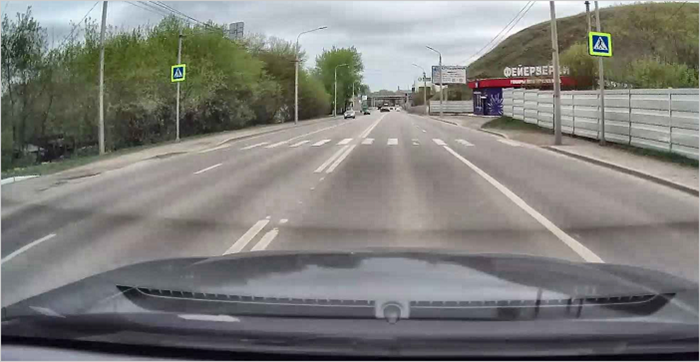
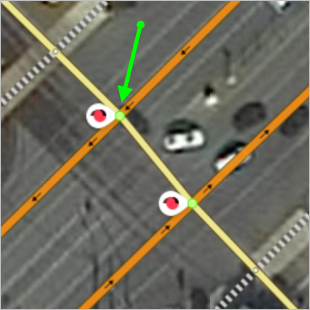
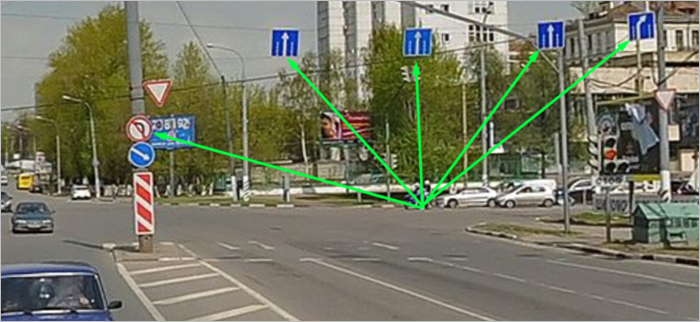
For example, on the picture prescriptive signs before the intersection show the required directions of movement and prohibit left turn:
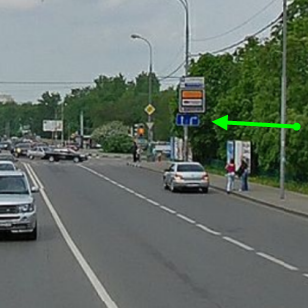
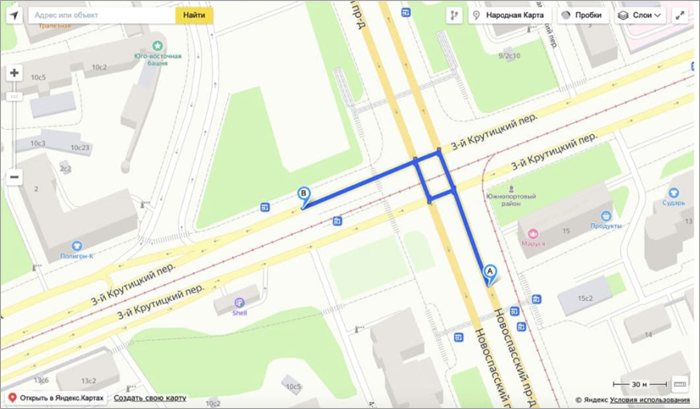
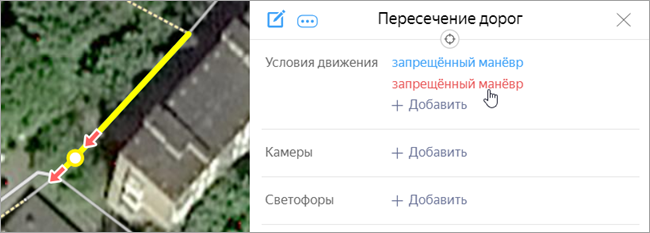
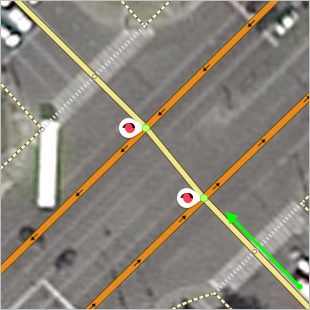
That spot looks like this on Yandex Maps (the green arrow shows the traffic direction):
-
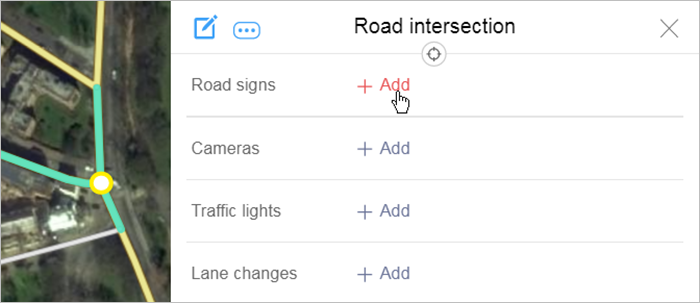
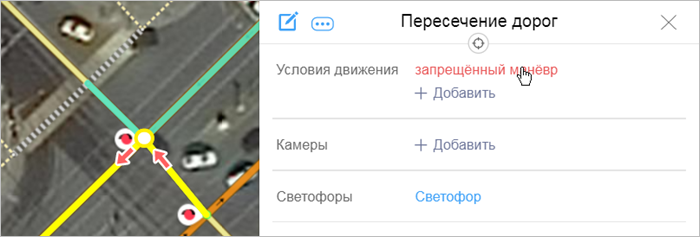
Click to highlight an intersection on the map (the Road intersection attribution panel opens):
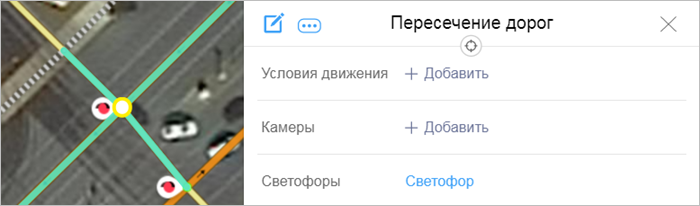
-
In the attribute panel that opens, click Road intersection and then click Add near Road signs: This opens the Road sign panel.
-
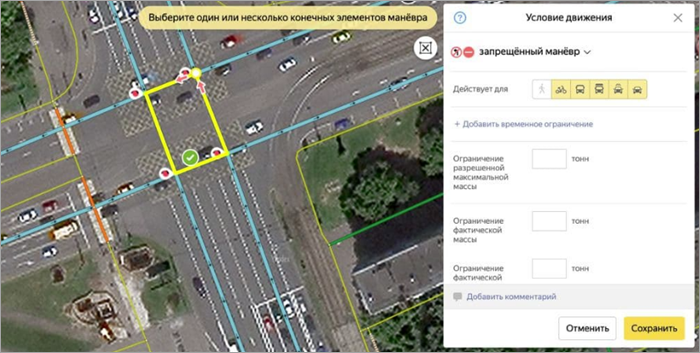
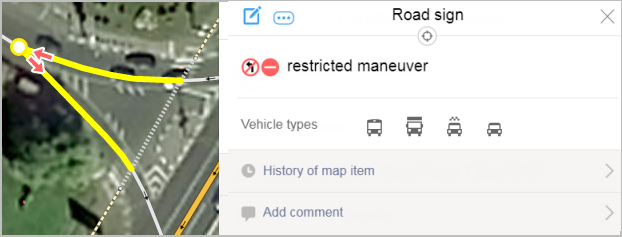
As the Road sign panel opens, select a value for your maneuver type from the list:
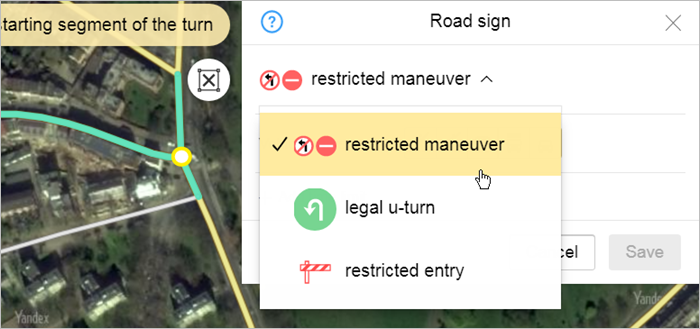
-
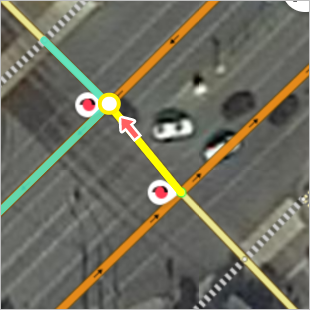
Click to indicate the first element of the maneuver (the section of road where the road sign located before the intersection where it takes effect):
A red arrow will mark the beginning maneuver element that you entered earlier.
If you entered the
Legal u-turn
maneuver during the last step, then only enter one (beginning) maneuver element.When created on the map, it is marked with this icon:
The Redraw
 button will appear on the panel.
Note
When you click on it, the data you entered will be deleted and you can add the road sign again.
-
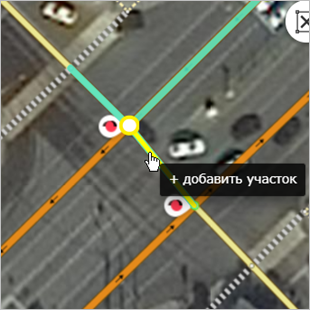
Click to indicate the final element(s) of the maneuver (the section(s) of road that the road sign applies to after the intersection where it takes effect):
The specified (final) maneuver element is also marked with a red arrow:
If you click on the road section again, it will be excluded from the maneuver.
-
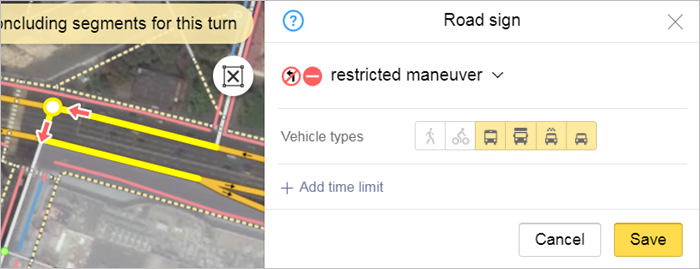
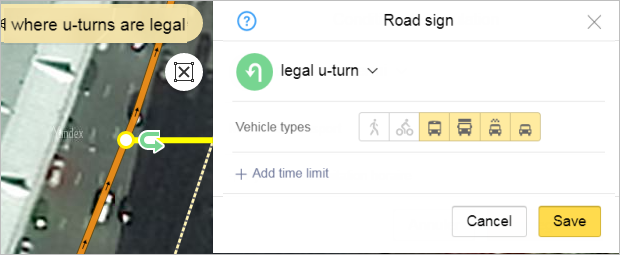
In the Applies to field, specify the types of vehicles to which the maneuver restriction applies, excluding public transport. For example, if it's not allowed to pass through the restriction on a bicycle without dismounting, then include it in the specified field.
Left-click the appropriate button to assign this attribute (repeat clicks enable/disable accessibility to pedestrians, bicyclists, public transport, trucks, light vehicles, or taxis on the road section).
A pictograph shows whether the attribute is enabled or not. The button becomes semitransparent when the attribute is disabled:
 →
→
When you create a new
Restricted entry
sign, make sure to fill in the Applies to field as accurately as possible to reflect the real-world situation, which you should cross-reference against open sources. If you can't confirm the situation on the ground, it is allowed not to include pedestrians and bicyclists in the restriction.For the
Legal U-turn
andRestricted entry
road signs, the Public transport attribute in theApplies to
field should be disabled (inactive).Only employees and users who have permission to work with the
Transport
layer or edit public transport routes can change the public transport attribute in the Applies to field (when absolutely necessary).You don't need to edit public transport accessibility for existing maneuvers.
Note
Enable accessibility to bicycles in the road sign attributes to create a maneuver on a class 10 road, even if bicycle accessibility is disabled on the road sections involved in the maneuver.
If a maneuver applies to road network sections inaccessible to pedestrians, enabling the attribute that determines whether the maneuver is accessible to pedestrians is redundant, but not erroneous.
-
Make sure to specify time limits if they apply to your traffic conditions (i.e. those traffic conditions are only valid during specific times).
Alert
Don't set time limits for public transport.
Time limits are only specified for traffic conditions like:
Restricted maneuver
on roads with vehicle traffic.Restricted entry
for pedestrians and all non-public transport types.
Time limits can be specified for any vehicle type they apply to. Create them in the following cases:
-
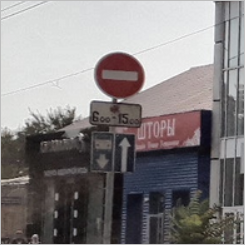
Time limits are specified on traffic signs. For example:
-
Entry to transport or pedestrians is restricted based on the area's operating hours.
If the exact closing time is unknown, the restrictions are set for the interval between 10 PM and 6 AM.
Do not use time limits in following cases:
-
Restricted traffic is not based on a strict schedule and the time might change (e.g. lift bridges).
-
Traffic on seasonal roads on weather conditions (e.g. ferry crossings and ice roads).
For such cases, send feedback via the web version of Yandex Map Editor or the mobile app.
How to specify time limits:
-
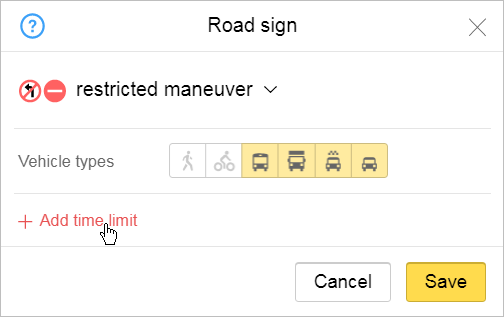
In the attribute panel that opens, click Road sign and then click Add time limit:
-
Enter the values for the restrictions in the fields that open:
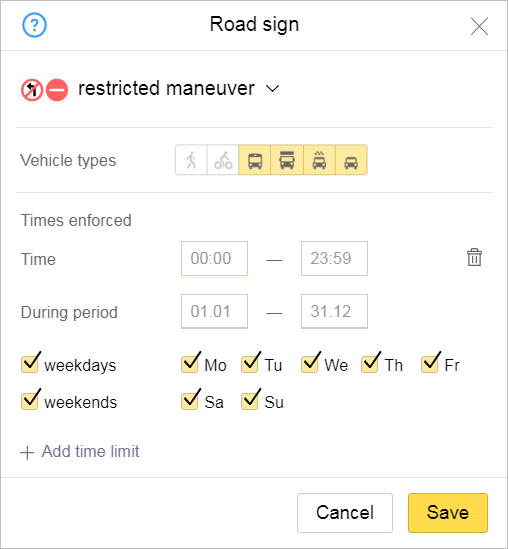
-
Time: The times when the action represented by the road sign starts and ends.
Enter time using the HH:MM format. For example, enter 8:00 a.m. as 08:00, and 8:30 p.m. as 23:30.
If the values of the fields are not entered, the condition always applies.
-
During period: the date when the action represented by the road sign starts and ends.
Enter dates using the DD:MM format. For example, write April 1 as 01.04, and November 23 — as 23.11.
If the values of the fields are not entered, the condition always applies.
-
Weekdays, days of the week, and weekends — check the appropriate boxes.
All boxes are checked by default. If the condition does not apply to all days of the week, then the desired options should be removed. For example, if a road sign only applies on weekdays, then uncheck the
Weekends
boxes.
If a road sign involves a few different time frames (that differ, for example, for weekdays and weekends or for different calendar periods), then click twice on Add time limit to open a second field where you can enter time restrictions along with the appropriate values.
To delete an extra time restriction entry field, just click
 (Delete).
Note
A time restriction will apply to all vehicle types that you marked. You need to create an individual traffic condition for every kind of vehicle if you wish for every type of vehicle to have its own time restrictions (e.g. daytime for buses and nighttime for trucks).
Time limits are set for the time intervals they apply to. The road sign is invalid the rest of the time.
-
-
In the item attribute panel, click Save.
-
The Road sign panel will close and the Road intersection panel will open. In the Road sign section of the latter, you'll see a restricted maneuver link. If multiple maneuvers are associated with the same intersection, each of them will have its own link associated with it:
The Road sign panel will open when you click on the link.
The item will be saved on the map and the intersection, if there is one, will turn green:
3.3.4.4. Road signs: examples
Traffic conditions must be set at intersections where additional information about road signs, traffic lights, or markings that define the specific driving rules for that intersection is needed to automatically set the route.
This section provides examples of road conditions:
- Example 1. Right turn at intersection forbidden
- Example 2. Left turn at intersection forbidden
- Example 3. U-turn forbidden
- Example 4. U-turns forbidden (permitted traffic directions indicated)
- Пример 5. Forbidden turns at road forks and intersections with exit ramps
- Example 6. Legal U-turn at break in solid line
- Example 7. Legal U-turn (not prohibited)
- Example 8. Left turn forbidden for bicyclists in accordance with traffic laws
- Example 9. U-turn forbidden at intersection
Example 1. Right turn at intersection forbidden
Before the intersection, prescriptive signs are set that show the required directions of movement and at the same time prohibit right turns:
This situation is mapped by specifying the traffic (prohibition of right turn at the intersection):
Note
This example shows one of several traffic signs at a complicated intersection.
Example 2. Left turn at intersection forbidden
Before the intersection, prescriptive signs are set that show the required directions of movement and at the same time prohibit left turn:
This situation is mapped by specifying the traffic (prohibition of left turn at the intersection):
Example 3. U-turns forbidden
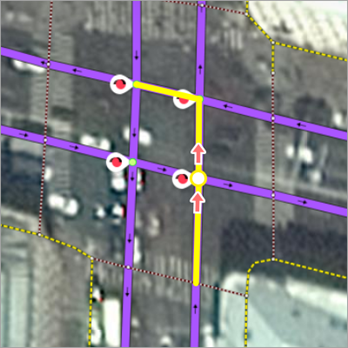
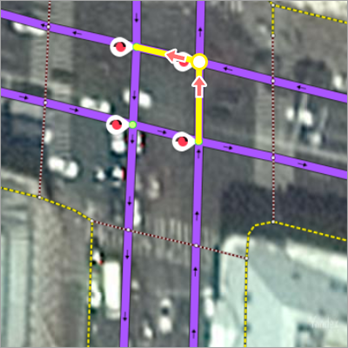
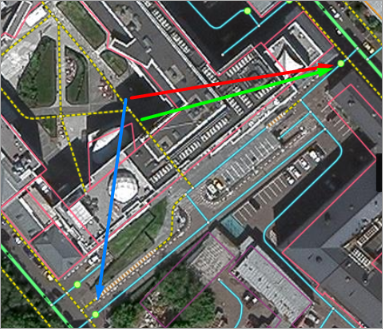
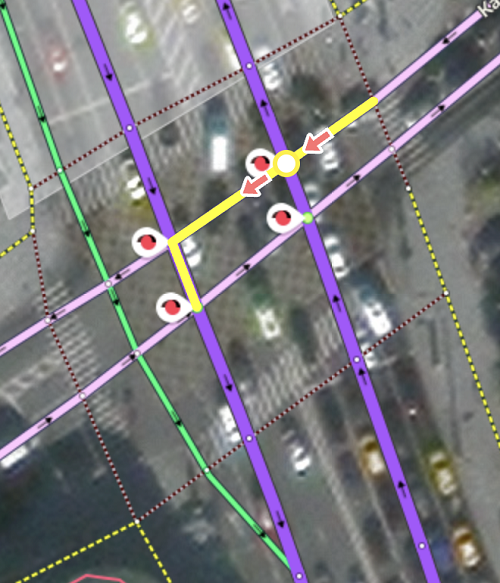
At this intersection, you can go straight or turn left, but you can not make a u-turn:

You can enter a traffic sign on the map to reflect this (see drawing): The maneuver includes two sections of the road after the intersection that the ban applies to (indicated by green arrows) - so that the permitted left turn is not prohibited:
Example 4. U-turns forbidden (permitted traffic directions indicated)
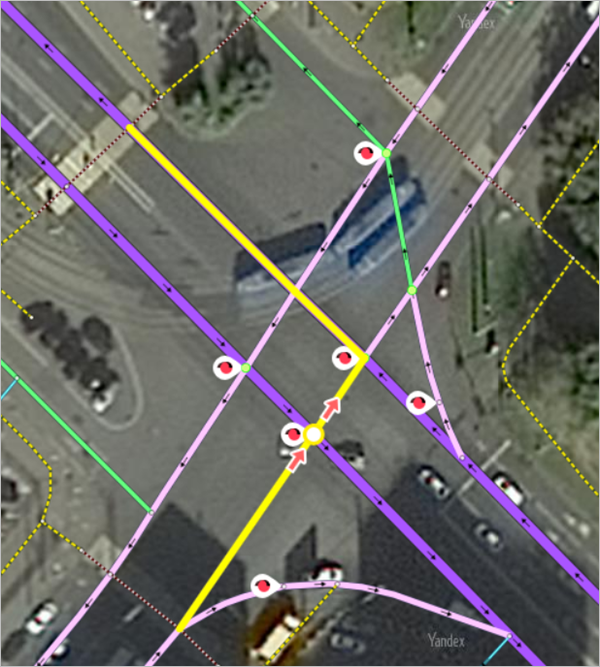
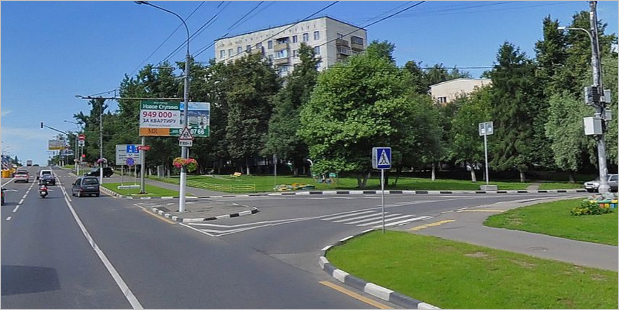
Before the intersection there is a sign prohibiting left turns, as well as prescriptive signs that show the required directions of movement and at the same time prohibit u-turn:
You can enter a traffic sign on the map to reflect this (see drawing):
Example 5. Forbidden turns at road forks and intersections with exit ramps
Example 5.1. Road fork
-
Perekopskaya St. forms exit ramps as it approaches the intersection, which is why u-turns are prohibited:
You can enter a traffic sign on the map to reflect this, as shown in the drawing. Here, u-turns are forbidden when the road splits to form exit lanes:
Note
If this type of ban isn't set, when there is a traffic jam on the main road, the automatic router can set a route that includes prohibited driving.
Example 5.2
-
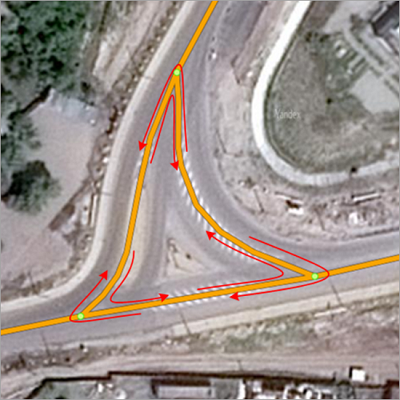
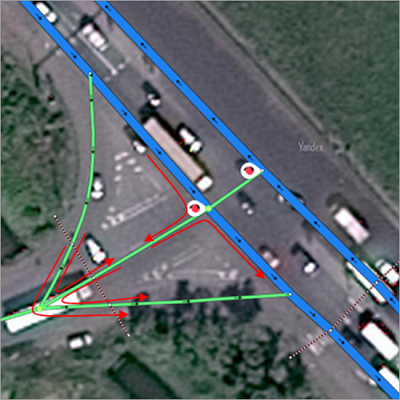
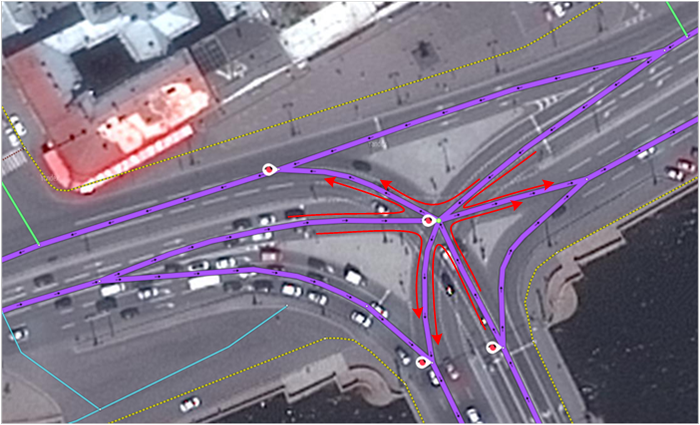
Three two-lane roads intersect at a fork in the lane:
This is mapped using the following road signs (red arrows mark the area where turns/u-turns are forbidden at intersections of central roads):
Example 5.3. Intersection of road with exit ramps
-
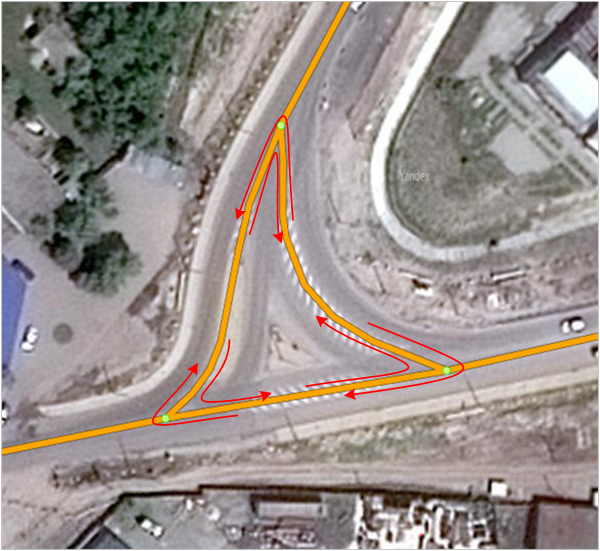
Intersection of road with exit ramps:
This is mapped using the following road signs (red arrows mark the area where turns are forbidden:
Example 5.4
-
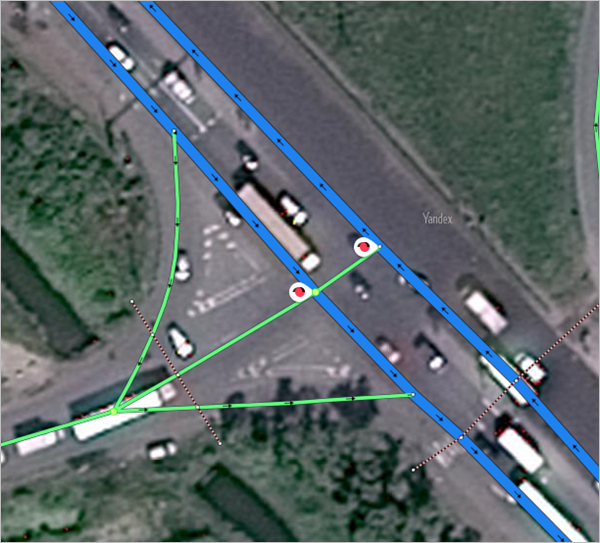
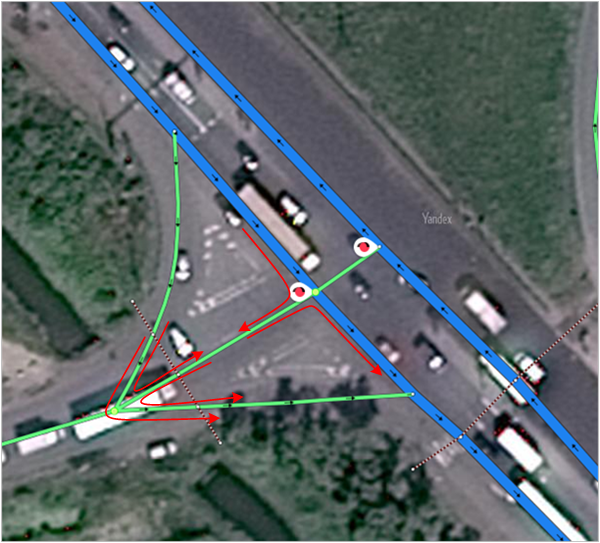
Three one-lane roads intersect at a fork in the lane:

This is mapped using the following road signs (red arrows mark the area where turns are forbidden:
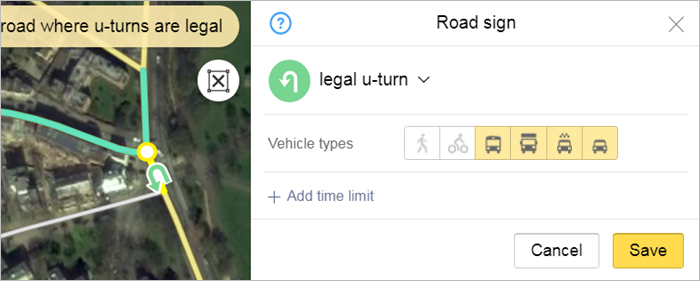
Example 6. Legal u-turn at break in solid line
A permitted u-turn at the point where the solid markup is broken is set by the corresponding condition of movement.:
Example 7. Legal u-turn (not prohibited)
At the intersection of a road drawn using one line that has no signs forbidding u-turns, you should enter four legal u-turn
road signs:
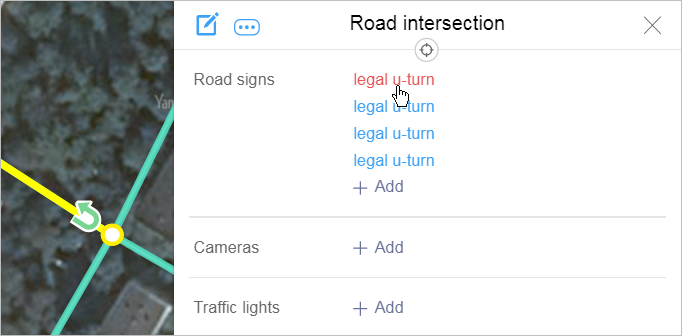
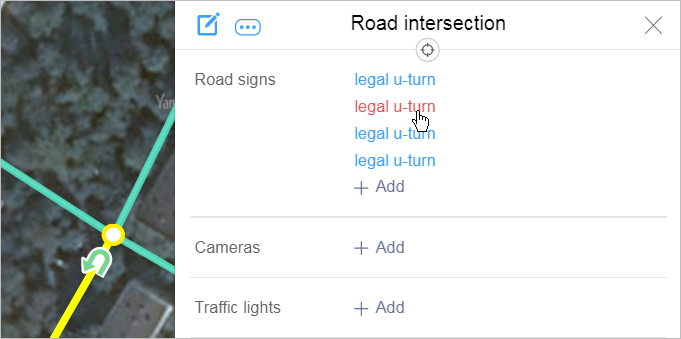

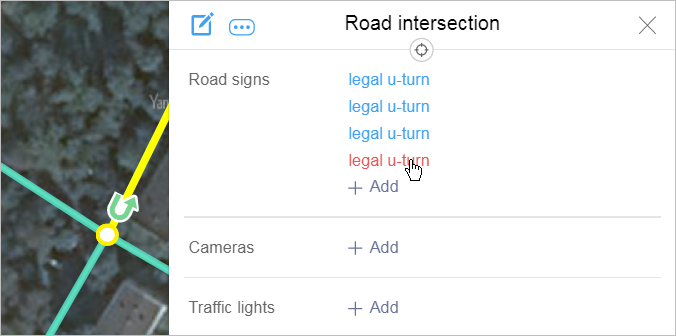
It is allowed to turn at all intersections where a u-turn is not prohibited and which do not specify the direction of movement on the lanes where u-turns are prohibited.
U-turns at intersections involving one-way streets may also be forbidden.
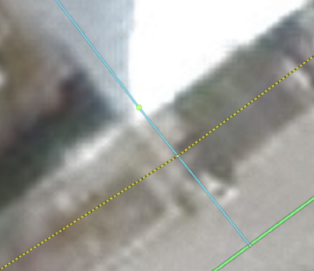
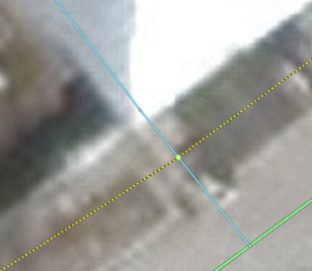
U-turns at the intersection of a one-lane and a two-lane road, provided they are not restricted by the traffic rules, should be drawn inside
the intersection as shown in the picture below (the white arrow indicates an incorrect placement for a permitted U-turn):
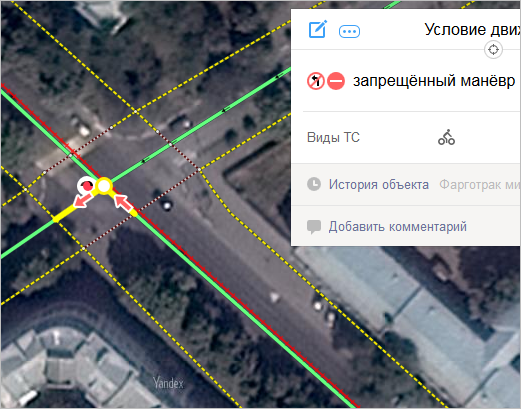
Example 8. Left turn forbidden for bicyclists in accordance with traffic laws
Bicyclists are forbidden from turning left and making u-turns on roads with tram lines in the middle of the road, and on roads that have more than one lane for traffic going in that direction.
That's why you must add a no left turn warning for bicyclists at intersections with a road containing a tram line.
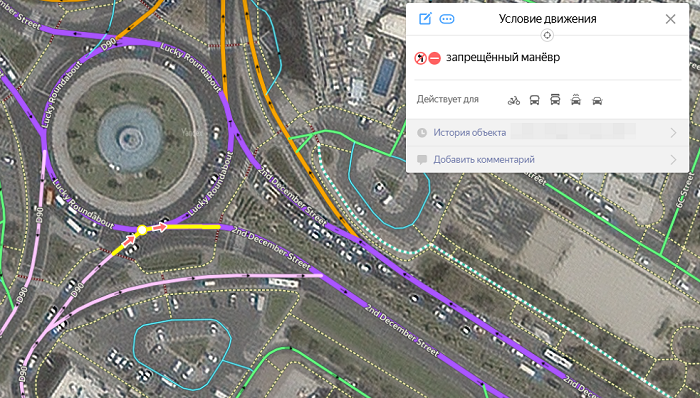
Example 9. U-turn forbidden at intersection
Applies in rare cases where the route is plotted with two u-turns in a row at an intersection of two-lane roads:
In those cases, you can add a complex ban on u-turns along with an example of an incorrect route in the comments under the map item: