Enabling a WordPress plugin
The Yandex Metrica team developed an official free-of-charge plugin for installing a web analytics tag on a website. The plugin runs on WordPress 5.2.9 and higher.
“Yandex Metrica” plugin features:
-
Adding new Yandex Metrica tags with the following options enabled by default:
-
Transmitting E-commerce events:
- Viewing an item profile.
- Adding an item to the basket.
- Removing an item from the basket.
- Making a purchase.
-
Providing details of transmitted product data.
To use the E-commerce features, install WooCommerce, a plugin for online stores, on your website.
Getting started
-
If you don’t have a Yandex Metrica tag yet, create one. Make sure the correct website URL is specified in the tag settings. To check this, go to the Yandex Metrica Settings page. Pay attention to the Address field value: it should show the URL of the website where you want to install the plugin.
-
In the tag settings, enable the E-commerce option. A container for collecting data from
dataLayerwill be added to the code snippet by default. -
Make sure no similar plugin that installs a Yandex Metrica tag is activated in WordPress. To check this, go to the Plugins page and search for the plugin with the name “Yandex Metrica”, “Metrica”, or “Metrika”. If you find one, deactivate it.
Step 1. Install the plugin
-
Go to the WordPress admin panel and log in.
-
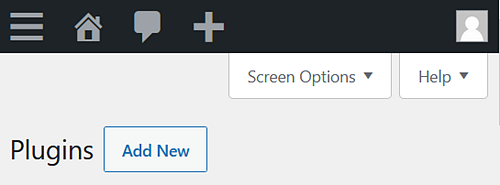
Go to the Plugins page and click the Add new button.
-
Add the plugin in one of the following ways:
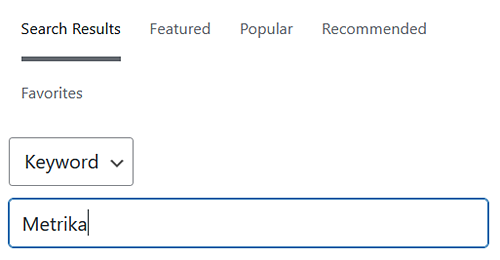
By searching for itUsing a fileFind the plugin named “Yandex Metrica” and click the Install now button.
Download a ZIP archive for plugin installation. Next, on the Add Plugins page, click Upload Plugin, choose the ZIP archive, and install it.

-
Go to the Plugins → Installed Plugins page and find the Yandex Metrica plugin. Activate it.
Step 2. Set up the plugin
-
Go to the Plugins → Installed Plugins page and find the Yandex Metrica plugin.
-
Open the plugin settings.
-
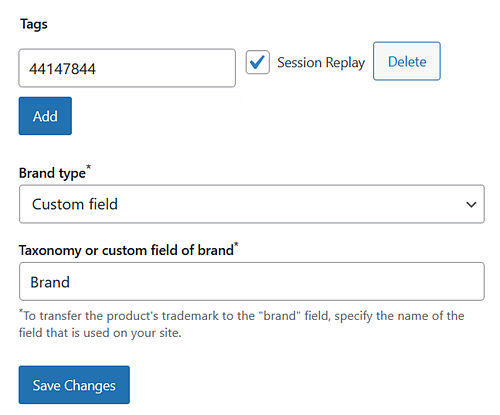
Enter the number of the tag installed on your website. If the plugin detects a Yandex Metrica tag on the website, the fields will be filled in automatically. Check if their values are correct. How to find the tag number
-
By default, the Session Replay option is enabled. It records user sessions so that you can analyze statistics in more detail. If necessary, you can disable Session Replay at any time.
-
Enter the Brand type so that information about your product brands will transmit correctly to Yandex Metrica and appear in reports.
-
Term — In the Taxonomy or custom field of brand field, specify the brand taxonomy.
How to find out the brand taxonomy
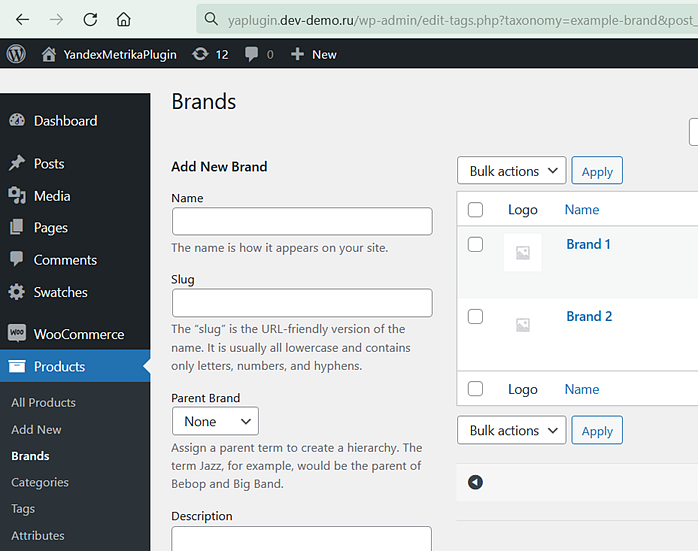
In WordPress, go to the Products → Brands page and take a look at the URL in the browser address bar — the
taxonomyparameter contains the brand taxonomy name. In the example, it'sexample-brand.
-
Custom field — In the Taxonomy or custom field of brand field, specify the name of the brand field.
How to find out the custom brand field
The field can be set using a plugin that is responsible for the functionality of brands on the site. If there is one on your site, you can use the plugin documentation or contact the developer’s support service to determine the name of the field.
You can also look up custom brand fields yourself in the database, if the field is provided by your WordPress theme.
-
-
Save the changes.
After the plugin is installed and set up, check out the error log. If you have any questions, ask them using the form below or go to the Yandex Metrica plugin page on WordPress (click Go to Support Forum).
Viewing common errors
- The WordPress version is obsolete. Check if a new version is available and install it. To do this, open the admin panel and go to the Dashboard → Updates page.
- The specified brand taxonomy is missing on the website.
- The theme doesn’t have the hook required for the plugin to run.
- The tag number contains characters that are not digits.
Step 3. Check if data is sent
Check if the following data is sent to Yandex Metrica:
E-commerce data appears in Yandex Metrica a few hours after it is first sent. To view e-commerce reports, go to Yandex Metrica and open Reports → E-commerce.
Data about sessions and pageviews appears in Yandex Metrica when the first website sessions occur after you install the plugin. To view statistics, go to Yandex Metrica and open Reports. For more information about working with reports, see Setting up and viewing a report.
Updating the plugin
When a new plugin version is available, a message saying that there is a new version is displayed in the WordPress admin panel. You can install an update in one of the following ways:
- Click the link in the message.
- Select the plugin on the Plugins → Installed Plugins page.
- Download a ZIP archive with updates. Next, on the Add Plugins page, click Upload Plugin, choose the ZIP archive, and install it.
Questions and answers
Why is the plugin not sending “Product views” events?
Most likely, the Colibri theme on the product page lacks the “woocommerce_before_single_product” hook. This hook is necessary for the plugin to function correctly. We recommend adding the hook to the theme.
|
Useful links |
Online training |