2.7.3. Simple polygonal items
Use the general drawing and editing techniques described in the following sections to draw simple polygonal items:
- 2.7.3.1. Drawing simple polygonal items
- 2.7.3.1.1. General drawing techniques
- 2.7.3.2.2. Drawing curves
- 2.7.3.2. Editing simple polygon items
- 2.7.3.2.1. Delete a vertex
- 2.7.3.2.2. Add vertexes
- 2.7.3.2.3. Straightening polygon segments
- 2.7.3.2.4. Make angle 90°.
- 2.7.3.2.5. Edit internal polygon
- 2.7.3.2.6. Copy and split a polygon
- 2.7.3.2.7. Undo edits and delete
In addition to the general drawing and editing techniques for polygonal items, there are rules for drawing specific items: buildings, bodies of water, and others. These rules are given in the subsections of Section 3. Global mapping rules.
2.7.3.1. Drawing simple polygonal items
To draw simple polygonal items, use the general techniques and the technique for drawing curves, which are described in the following sections:
2.7.3.1.1. General drawing techniques
To draw a polygon:
- Click the item category, such as Buildings
 .
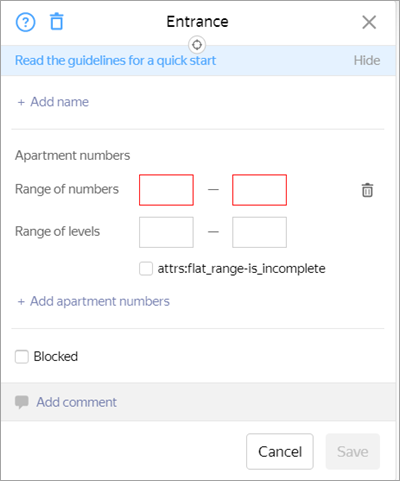
.The attribute panel for the map item opens:
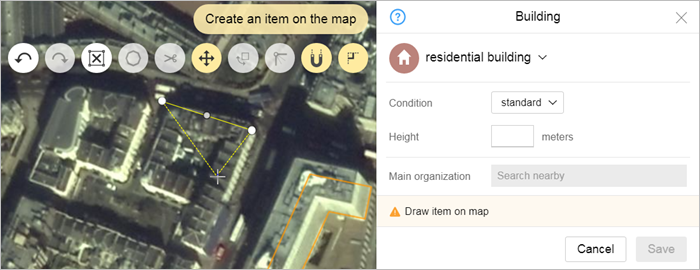
Additionally, you will see a local toolbar that contains the following:
 — Undo. Cancels the last operation with that map item. Keyboard shortcut Ctrl + Z.
 — Redo. Repeats the last operation with that map item (in other words, it reverts the item back to its state before you "undid" the last operation). Keyboard shortcut: Ctrl + Y.
 — Redraw. The button is deleted and you can start drawing it again (keyboard shortcuts Ctrl + X).
 — Split This mode will let you enter lines that will then split the polygon when you save it.
- You can also draw a closed shape. In this case, the cut-out polygon will be located inside the original one and have its characteristics.
- This mode is used when you draw buildings that have shared walls of various heights. See 2.10.5. Map items: split..
 — Drag-and-drop mode. In this mode, you can move the item to the correct position without changing its shape. For example, if you drew the outline of the building based on its roof, you can drag it so that the outline lines up with the foundation instead.
 — Scaling and rotation mode. In this mode, the item is framed, which lets you turn it by the appropriate number of degrees or change its size without ruining its proportions (see below).
 — Make angles equal. If the difference between the polygon's angles is not significant, then it will make all the rectangle's angles 90 degrees. This is used for drawing rectangular items such as buildings. Keyboard shortcut Ctrl + A.
 — Snap to other map items mode. In this mode, the vertexes of the new item snap to neighboring polygons that were drawn earlier. This mode is used when you draw buildings that have shared walls of various heights.
 — Highlight set angle mode. In this mode, the angles become 90° semi-automatically. This mode highlights the position your cursor is in when the angle is 90°. You don't have to draw right angles, the highlighted cursor position may be changed). This is used to draw buildings with unusual shapes (where the footprint protrudes and caves in).
- Draw item on mapAttention.
When drawing, follow 2.7.1. General rules for drawing polygonal items.
- Click on the beginning point of the polygon. The cursor will turn into a cross.
Move your cursor to draw the contour:
 Note.
Note.As you draw buildings, the angles will automatically be straightened to 90°. This makes it easier and faster to draw rectangular footprints.
You can disable this option when you draw buildings with footprints that are not rectangular. Just click and hold Shift (if you release the button, the function will automatically turn on again).
- Release the mouse button, move your cursor to the next vertex of the polygon and and set it.
Every vertex of the polygon displays as a circle on the map.
In the middle of the two consecutive vertexes you entered, you'll see points that you can use to bend the line (see below).
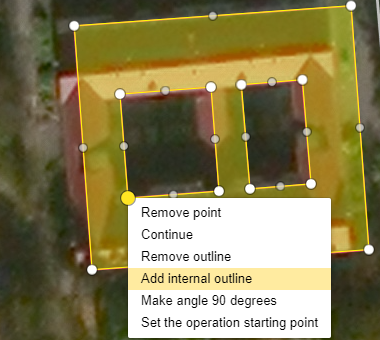
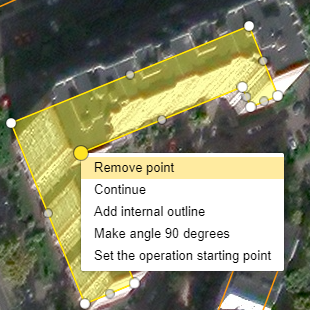
Click on any of vertexes to open the context menu:
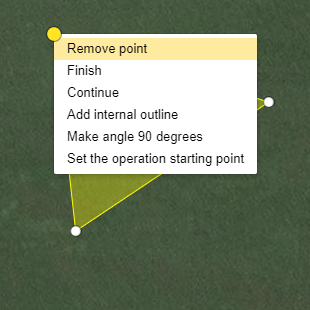
Click on one of them to perform the corresponding operation:
- Delete — delete the vertex that is currently selected.
- Finish — finish drawing the polygon.
- Continue — continue drawing a polygon that was previously "finished" (starting from the current point).
- Delete outline — delete an internal polygon (only available if there is an internal polygon).
- Add internal polygon — draw an internal polygon within the borders of the current polygon.
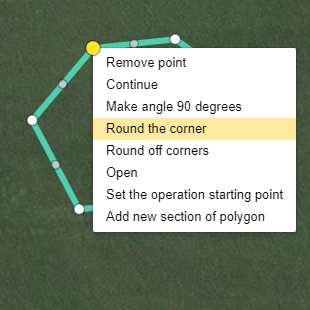
- Make angle 90° — to make the selected vertex 90°.
Round the corner — round the selected corner (i.e. draws it using several vertexes). This command is available for drawing vegetation, terrain, and hydrography items, as well as administrative divisions.
Round all corners — round all the item's corners (i.e. draw them using several vertexes). This command is available for drawing vegetation, terrain, and hydrography items, as well as administrative divisions.
Note. After using this tool, examine the edited item to make sure there are no sharp corners left, rounding them manually if necessary.
- When you draw buildings that contain section with different heights, those sections are drawn as separate buildings.
If you need to add a shared border to a polygon (for example, to draw a building that has sections with different heights), click
— Snap to other map items mode.In this mode, the vertexes of the new polygon will snap to the neighboring polygon that was drawn earlier (the vertexes will change colors when you snap them to each other).
- You can move the polygon if necessary (for example, to shift a building outline that was drawn based on the roof to the location of the foundation). Just click — Dragging mode and drag the selected outline to the correct place.
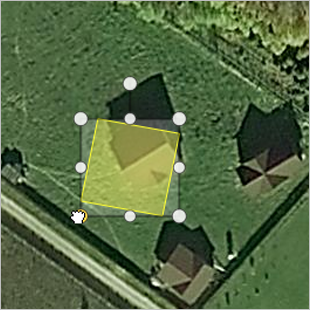
- You can turn an item by the appropriate number of degrees or change its size without ruining its proportions. Just click — Scaling and rotation mode.
The item will be framed:

You can turn the item by dragging the frame marker “with a tail”:
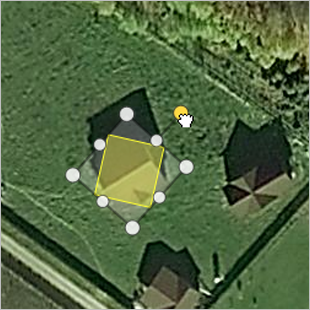
Or you can change its size without changing its proportions (just use the markers in the corners of the frame):
- To add an internal polygon to the polygon (for example, to draw a courtyard within a building), select any vertex and click Add internal polygon in the context menu.Attention.
When drawing internal polygons, follow 2.7.2. Rules for using internal polygons.
Then draw the internal polygon (much like you drew the main polygon):
- After you draw the outline:
- Select Finish in the context menu.
- Click
 .
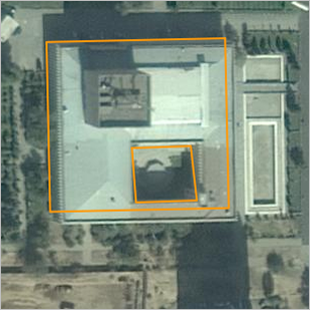
.After you have drawn and saved the outline, the panel will close and the outline will appear on the map.
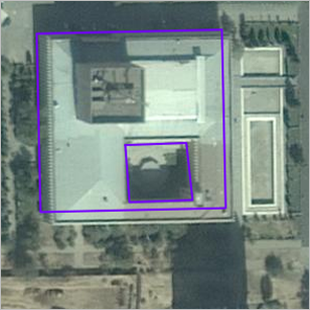
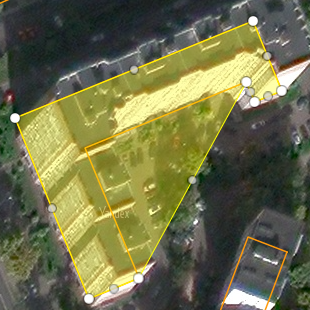
The color of the outline depends on the type of map item. For example, residential buildings are orange, and industrial buildings are purple:
If you don't want to save your outline, click
 .
.The outline will disappear.
When you select an item, it lights up and its name appears in a "tip":
2.7.3.2.2. Drawing curves
When drawing simple polygonal items (hydrography, vegetation, or terrain items), you can use the Drawing curves tool to simplify the process.
Here's how to use it:
When you start drawing an item, click Curve drawing mode:
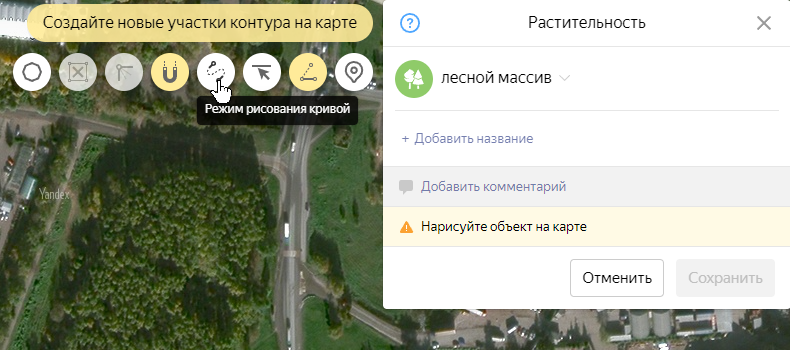 Note.
Note.Instead of clicking the Curve drawing mode button, you can use keyboard shortcuts Cmd + K / Ctrl + K before you start drawing.
Pressing the combination again turns off the mode.
Click on the item's start and end points. They will be connected by a line (highlighted in yellow):
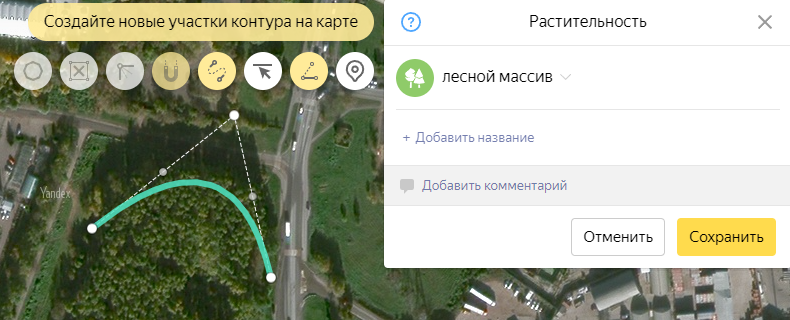
This line can be transformed by moving the nodal points (displayed on the dotted line) with the mouse.
When you are happy with the line, clickCurve drawing mode again to turn off the mode.
The curve will be saved in the editing mode, which will allow you to correct its shape and placement:

- Click Save to save your item.
2.7.3.2. Editing simple polygon items
You can edit a simple polygon by performing the following operations:
- 2.7.3.2.1. Delete a vertex
- 2.7.3.2.2. Add vertexes
- 2.7.3.2.3. Straightening polygon segments
- 2.7.3.2.4. Make angle 90°.
- 2.7.3.2.5. Edit internal polygon
- 2.7.3.2.6. Copy and split a polygon
- 2.7.3.2.7. Undo edits and delete
2.7.3.2.1. Delete a vertex
You can delete vertexes that you positioned incorrectly. After you delete the vertex, you can continue editing the polygon.
To delete a vertex:
- Select the item on the map. The attribute panel for the map item opens (for example, “Building”).
- In the attribute panel that opens, click Edit
 .
.The item and attribute panel will switch to editing mode:
- Click on the appropriate vertex to open the context menu. Then click Delete. The vertex you selected will be deleted. In its place will be a straight line connecting the vertexes that neighbor the one you deleted:
- Click Save. Your changes will be saved.
2.7.3.2.2. Add vertexes
You can add a vertex to correct your drawing of an item. After you add vertexes, you can continue editing the polygon.
To add vertexes:
- Select the item on the map. The attribute panel for the map item opens (for example, “Building”).
- In the attribute panel that opens, click Edit.
The item and attribute panel will switch to editing mode:
- Drag the point in the middle of two vertexes to the appropriate place. Release the mouse button to place the new vertex in the position you selected:
- Click Save. Your changes will be saved.
2.7.3.2.3. Straightening polygon segments
To straighten a polygon segment between two vertices (removing all vertices between the first and last vertices of the segment being straightened):
- Select the item on the map. The attribute panel for the map item opens (for example, “Building”).
- In the attribute panel that opens, click Edit.
The item and attribute panel will switch to editing mode:
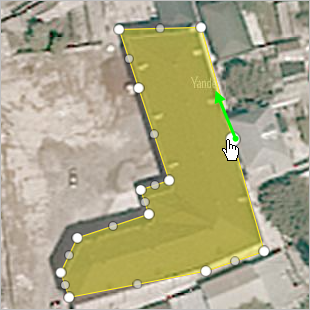
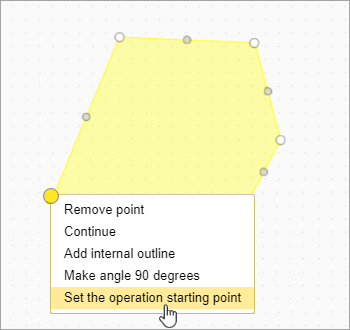
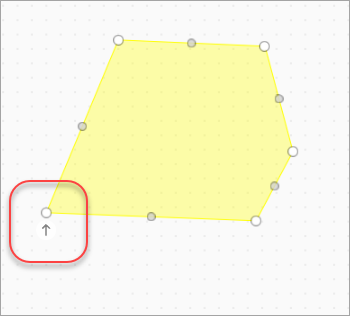
- Click the first of the vertices you plan to delete and select Set the operation starting point in the context menu that opens:
The selected vertex will be marked with an arrow:
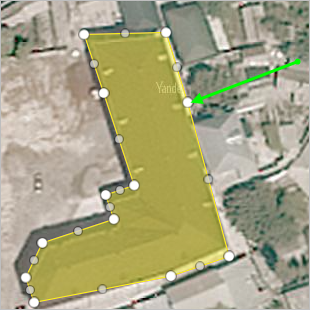
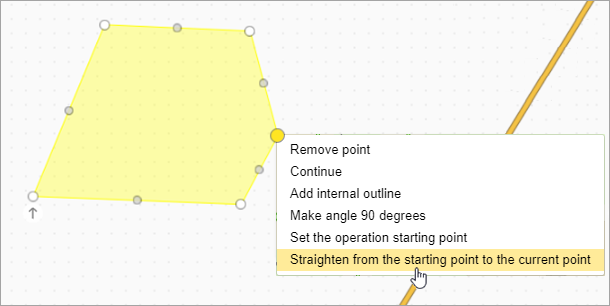
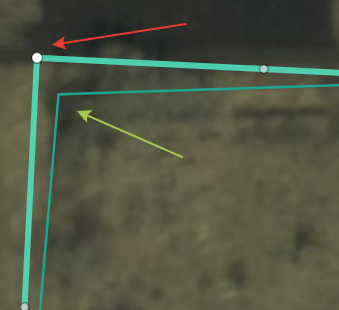
- Click the last of the vertices you plan to delete and select Straighten from the starting point to the current point in the context menu that opens:
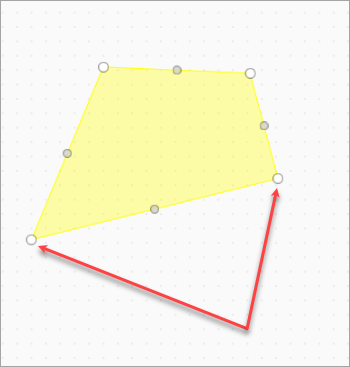
The line between the first and last of the vertices to be deleted will be straightened, and the vertices between them will be deleted:
- Click Save. Your changes will be saved.
2.7.3.2.4. Make angle 90°.
You can make an angle 90° if you did not manage to draw a perfect right angle yourself. After you make the angles right, you can continue editing the polygon.
To make an angle 90°:
- Select the item on the map. The attribute panel for the map item opens (for example, “Building”).
- In the attribute panel that opens, click Edit.
The item and attribute panel will switch to editing mode:
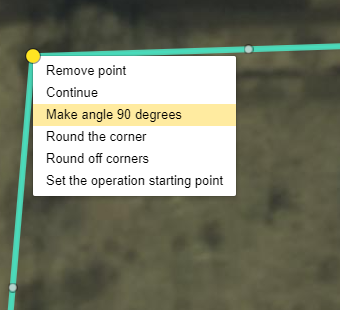
- Select the appropriate vertex to open the context menu and then click Make angle 90°. The point you selected will become a right angle:
- Click Save. Your changes will be saved.
2.7.3.2.5. Edit internal polygon
When drawing internal polygons, follow 2.7.2. Rules for using internal polygons.
To edit the shape of an internal polygon:
- Select the item on the map. The attribute panel for the map item opens (for example, “Building”).
- In the attribute panel that opens, click Edit.
The item will switch to editing mode and a local toolbar will open:
- Edit an internal polygon.
internal polygons are edited the same way that polygons are:
Additionally, you can delete an internal polygon. Just select Delete outline from the context menu after you click on any point of the internal polygon.
- Click Save. Your changes will be saved.
2.7.3.2.6. Copy and split a polygon
To draw several identical items (such as buildings based on the same blueprint), just Copy an item.
The copy procedure is described in Section 2.10.4. Map item: copy.
To split a polygon such as a building, you can use the Split function.
You can also draw a closed shape. In this case, the cut-out polygon will be located inside the original one and have its characteristics.
The cutting procedure is described in Section 2.10.5. Map items: split..
2.7.3.2.7. Undo edits and delete
You can use the Undo edits button to return an item to the condition it was in before you started editing it (all the way back to the condition it was in when it was last approved by a moderator). If the item was created recently and still hasn't been approved by the moderator, then undoing edits will result in the item being deleted.
Only moderators have access to the Delete operation that lets them delete an item. YME users can delete items they created in error by undoing their own edits until the item disappears (if they created it themselves and it was not approved by a moderator yet). If an item that was created earlier and already approved by a moderator needs to be deleted, you should report it to the moderator.
The procedure for undoing edits is described in Section 2.10.6. Item: Undoing edits, error messages, deleting items, links to items.
2.7.3.2.8. Reporting errors to the moderator
If an item was already approved by the moderator, then undoing edits will return the item to the condition it was in when it was approved. In this case users cannot delete an item by themselves and will need to report the item to the moderator for it to be deleted. You can send error reports to the moderator regarding a number of issues, not just when you need to remove an item.
The procedure for sending reports is described in Section 2.10.6. Item: Undoing edits, error messages, deleting items, links to items.
