3.18.2. Indoor maps. Rules for adding attributes
The rules for adding attributes to indoor maps are shown below in the following sequence: Map → Level → Indoor Areas → Barriers → Infrastructure → Information items → Locations (organizations).
Alert
Users are currently unable to create indoor map items.
3.18.2.1. Indoor map
To create an indoor map, do the following:
-
Click Create and start typing
Indoor
in the quick search bar: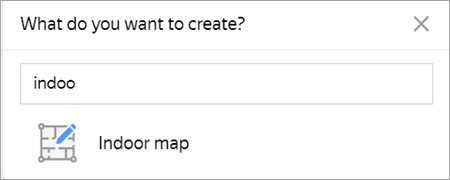
-
Choose Indoor map. The Indoor map panel will open:
-
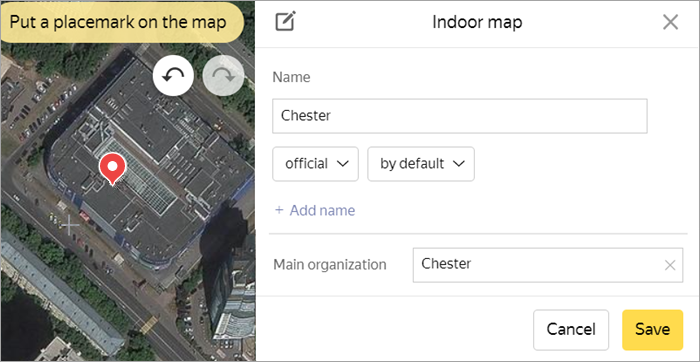
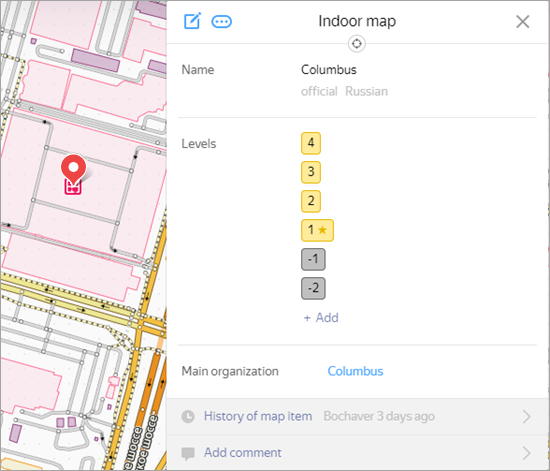
Enter a name for the map in the Name field.
-
Enter or select the name of the organization that the building you're creating a map for belongs to in the Main organization field (only accessible by YME staff).
-
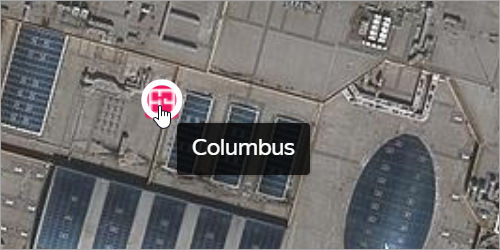
Specify the point where your indoor map's placemark should be displayed on the larger map and click Save.
A placemark will appear on the map
 , and the Levels menu will be added to the panel:
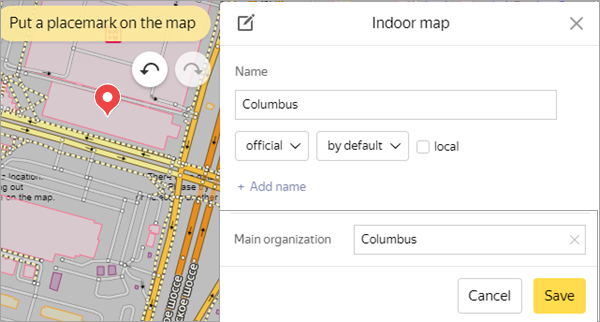
3.18.2.2. Indoor map levels
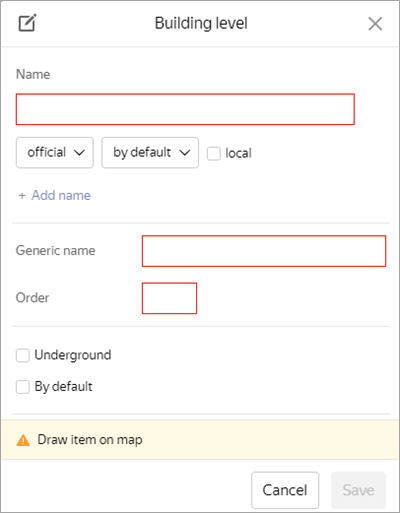
If the map you're editing should have different levels, click Add in Levels.
-
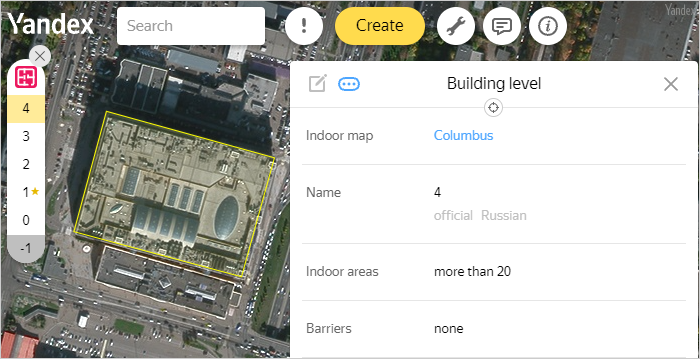
The Building level panel will then open:
-
Specify the level's attribute values, such as:
-
Name — the name of the building level, which can be a number (for example, -1, 2) or a combination of letters and numbers (for example, P1).
-
Generic name — the number that determines the name of the level (1, 2,...). Typically, its value matches the value of the
Order
attribute. -
Order — the number that determines the position of the level in relation to other levels.
For example, if a building has levels -2,-1,0,1,2, their numerical order will be 1,2,3,4,5 (numbering starts from the lowest floor).
-
Underground — use this value if you're editing an underground level.
-
Default — this value indicates that the level being edited is displayed on the map by default. Usually that's the first floor.
-
-
Draw an item (the indoor map level) on the map. For drawing rules, see 3.18.1.2. Indoor map levels.
-
Click Save in the panel.
The indoor map level will be saved on the map.
A link to your level will appear in the Levels section of the Indoor mappanel.
If there is more than one level, you have to create them separately in the same manner.
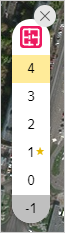
Hover your cursor over the level item to highlight it on the map:
-
Click the relevant link.
The Building level panel will then open:
The level item will be highlighted on the map, and a level toggle panel will appear:
3.18.2.3. Areas
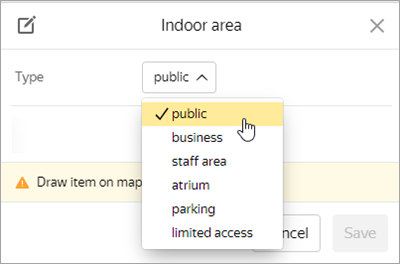
If the level you're editing is made up of multiple areas, click Add where it says Areas. Draw an area on the map (for drawing areas, see 3.18.1.3. Indoor areas.
Specify the Type of the area, which is its only applicable attribute.
-
Business — spaces for vendors of goods and services inside a shopping mall.
-
Public — Areas intended for public use, such as restrooms, baby care rooms, spaces allocated for elevators, stairs, escalators, and lounge areas.
-
Staff — facilities not intended for public use and only accessible to staff. This includes storage and staff rooms, stockrooms — and, additionally, fountain basins, large flowerbeds, etc.
-
Atrium — openings between two or more floors that include several sources of light. Draw atriums on floors with openings underneath.
For items in this category, don't draw open spaces used exclusively for escalators or stairs.
-
Indoor area — specially equipped areas intended for catering services (food court), recreation (waiting area, waiting seats), and other services in public areas that are relatively isolated and not intended for through traffic.
Alert
Map standard waiting areas as the Indoor area type and business halls as theBusiness type. Always set a map caption name for places in the Waiting areas and seats category if they have a proper name.
-
Parking space — areas for parking lots. Areas for the disabled are not marked as an extra parking space.
-
Restricted access — passport and customs control, preflight inspection areas at airports.
-
Railway platforms — railway platforms at train stations that overlap with train station maps.
Alert
When drawing new indoor maps, all rooms that house or are expected to house organizations are drawn as Business
-type rooms. When an organization is shut down, please don't change the room type to Staff
and leave it as Business
.
3.18.2.4. Barriers
If the level you are editing is divided into separate zones by barriers (partitions), click Add in the Barriers section on the Building level panel.
Draw a barrier on the map (for drawing barriers, see 3.18.1.4. Barriers).
3.18.2.5. Infrastructure items
If the level you're editing includes amenities (elevators, escalators), go to the Indoor map level panel and click Add in the Infrastructure section.
The Infrastructure panel will open:
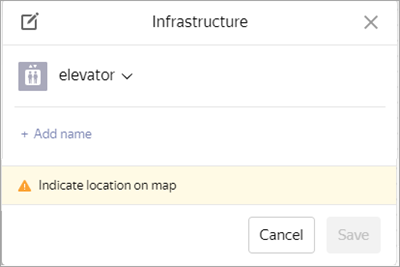
-
Select the appropriate infrastructure item:
- Elevator
- Stairs
- Moving walkway
- Escalator
- Emergency exit
- Fire escape ladder
- Metal detector
- Baggage checkpoint (drawn only in buildings related to transportation)
- Departure gate (drawn only in buildings related to transportation)
- Ramp
- Fountain
- Parking ticket terminal
- Parking area
- Accessible parking space
- Elevator for the disabled
- Emergency desk (a column with an in-built intercom system for quick communication with firefighters, police, or rescue services)
- Waste collection area (various containers for waste sorting, except containers and bins in food courts).
-
Draw the item on the map (an infrastructure item inside a building level).
For drawing rules, see 3.18.1.5. Infrastructure.
-
An infrastructure item should only be given a name if it further defines the item's category.
-
Click Save in the panel.
An amenity within its level's boundaries will be saved on the map.
A link to the created amenity will then appear in the Infrastructure section of the Indoor map level panel. Hover your cursor over the item (amenity) to highlight it on the map.
-
You can create more infrastructure if there is any using the same method:
3.18.2.6. Information items
Items related to information management are created on indoor map levels in the same manner as infrastructure:
- Arrivals board (drawn only in buildings related to transportation)
- Departures board (drawn only in buildings related to transportation)
- Information stand
- Map
- Information desk
- Meeting place
- Board (used to indicate flight and railway timetables if it displays both departures and arrivals). Official name: Departure-arrival board.
Go to the Information section of the Building level panel to manage Information items. For drawing rules, see 3.18.1.6. Information items.
An information item should only be given a name if it further defines the item's category.
3.18.2.7. Locations (organization items)
On indoor map levels, Locations are created in the same manner as infrastructure and information items: organizations of different categories (auto, food, retail, and so on). See the list of categories in 3.6.2.1. The Yandex Map Editor block):
-
Click Add in Locations on the Indoor map level panel.
The item category panel will open (What will you create?).
To learn more about the panel and the attribution rules for organizations, see 3.6.2.1. The Yandex Map Editor block.
The differences include:
-
Indoor maps can't include the following item types: Shopping center, Flea market, Farmer's market, Stadium, Sports complex, and others. They also have their own types, such as Ticket counter, Aquarium, and others.
-
Currently, indoor maps don't include uncategorized items.
-
Transport items may feature special services, structures, and places that are not typical for shopping centers:
-
Postal and communication services.
-
Law enforcement and intelligence agencies.
-
Administration (administration + station master).
-
Station attendant.
-
Military commandant office.
-
Customs and migration control, including phytosanitary and veterinary control, as well as currency declaration offices.
-
Baggage storage.
-
Baggage service (baggage trolleys, baggage packing, baggage payment, baggage search, lost and found, and so on).
-
Check-in.
-
Baggage carousel.
-
Oversized baggage check-in.
-
Oversized baggage claim.
-
-
-
Draw an item (an organization inside a building level) on the map. For drawing rules, see 3.18.1.7. Places (organizations)
-
Enter the item name according to the naming rules for
Locations
, see 3.6.2.1. The Yandex Map Editor block. -
Click Save in the panel.
An organization within its level's boundaries will be saved on the map.
-
After all the relevant information is added to the map, close the Levelpanel.
The Indoor map panel will open (see above). You can use it to edit other levels if you need.
3.18.2.8. Viewing indoor maps
Close the Indoor map panel.
Your indoor map will appear on the map as an icon :
To display indoor maps on the main map, enable the Indoor maps layer in the Layers panel and select your indoor map.
All indoor maps will then show up on the main map. Choose a level in the Indoor map panel to display its map: